Editors

 
This file describes the various editors in FRED. These are accessed from the Editors menu. It is these editors that give FS2_Open missions their variety and depth. Although the original FRED 2 editors were powerful, FRED2_Open has boosted the sheer amount of stuff the editors can do. Out of all the original FRED Documentation that was updated for Disapora, this one required the most work.

The dialog boxes opened by some of these editors may too big to fit on your screen. If this is a problem, try turning your desktop resolution up to 1024x768.

The sections of this file are:

Ships Editor

 
This editor lets you change the characteristics of an individual ship. By marking several ships, you can edit them all at once (for example, turn them all hostile).

Many of the things that can be done with the Ships Editor can also be done with the Wings Editor. When dealing with wings, use the Wings Editor whenever you have a choice.

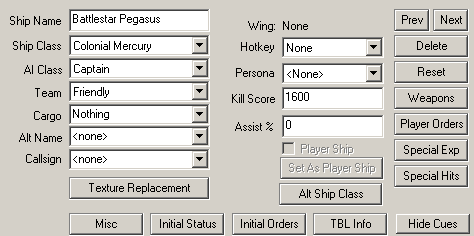
At the upper left of this editor is a pull-down menu to let you select a ship. When you first open it, the Ships Editor has all currently marked ships selected. Any fields (such as Name) which are not the same for all ships will be blank.

In the upper right are Prev and Next buttons, which let you cycle through the ships in your mission. Delete deletes the currently marked ships, and Reset resets everything in the Ships Editor to default values.

Main Area

Ships Editor

You can change the Name and Class of a ship here.

You can also set skill the of AI (Artificial Intelligence) controlling this ship. Skill levels are named after military ranks. The higher the rank, the better the AI. Coward will attempt to evade. None will react little and take no initiative.

Team (also known as IFF) is used to give a broad idea what side a ship is on in a battle. Teams define which ships the AI will view as enemy ships and which ones they'll ignore completely. They also (partly) define the colour that a targetted ship will appear on the player's HUD in game. There are several teams to which a ship can belong. The basic teams (Friendly, Hostile, Neutral) should seem fairly self explanatory. Traitor is the IFF the player will be given if he starts killing his own team mates in most missions (although this can be turned off). Traitors attack other traitors too so setting all the ships to Traitor is one way to ensure they will all try to kill each other.

Cargo indicates what, if anything, this ship is carrying. This is used mostly for transports, of course. The button at the right side of this field lets you select from a list of cargoes on other ships in this mission. You can simply type in a new cargo name if none of them are suitable.

If you specify something in the Alt Name field, this will be shown as the ship's class in the player's HUD. This is useful when a ship is supposed to be obscured or far away and you don't want the player to be able to tell what it is just by targeting it.

Callsign is used by the game to allow you to attach a callsign to a ship which will be used in messages instead of the ships name. This is mainly to get around the limitation that ships in a wing will always be named Wingname <Number>. Using callsign allows you to send messages from Starbuck rather than Red 1 or Red 1 : (Starbuck).

If this ship is part of a Wing, this is indicated.

Hotkey lets you assign a default hotkey for pilots to target this ship. More than one ship can have the same hotkey; pressing it in flight will target all such ships.

F5 through F8 are generally reserved for for the first four starting wings (see the Mission Specs Editor for details). You should use F9 through F12 for the ships the player is most likely to target: freighters being escorted, stations being guarded, capital ships being attacked.

The player can alter their hotkey setup during the game. (The default key for doing this is F4.) If a ship's arrival is supposed to be a surprise, you don't want the player to see it when they do this. In this situation, give the ship the hotkey Hidden.

Persona determines which built in mission chatter is played for this ship. The game defines a certain amount of build in messages for occasions which are difficult or far too common to script in using the SEXP system (Saying yes or no to orders, warning you of a fighter on your tail, giving you praise when you kill an enemy). If a fighter or bomber is not given a persona the game may automatically give it one at random. For this reason, you should always ensure that the character of the persona you give to a ship matches any scripted dialogue you also gave it. In some games on the FS2_Open engine, persona will also determine the video that is transmitted along with the message.

Kill Score is the number of points (toward promotion) the player earns for doing the most damage to an enemy ship that is destroyed in the mission. Despite the name it does not automatically go to the player if he actually kills the ship. This makes kill stealing virtually pointless in the game.

Assist % is the percentage of the Kill Score a player will earn if he helps destroy a ship (by doing over a certain percentage of the damage) but wasn't the one who did the most damage.

Player Ship is checked for ships flown by a player. The main use for this is to add player ships to multiplayer missions since y default the first ship in a mission is already a player ship.

Next and Prev allow you to cycle through all the ships in a mission. Revert sets the ship back to the default settings for this class of ship.

Weapons


Pressing the Weapons button opens the Weapons Editor. Here, you can change the weapons mounted on the ship, as well as the AI class of each gunner. (These are just the default settings. Players can be given some choice as to their weaponry with the Team Loadout Editor.)

Pilot is not a weapon mounting point; this is just another way to set the pilot's AI class, equivalent to setting it in the main Ships Editor.

Player Orders

This dialog box lets you choose which orders a ship will accept from a player. The example at right is for a fighter; there will be fewer options for a capital ship, which does not accept as many orders from a fighter craft.

Special Explosion

This lets you provide an unusual explosion when and if this ship is destroyed. Damage is the amount of damage taken by ships caught within the Inner Damage Radius of this ship when it blows. The amount of damage decreases steadily out to the Outer Damage Radius, where no damage is taken. Blast determines how hard anyone caught in the explosion is pushed away from it. The Shockwave is the blue visual effect seen on some large explosions.

Special Hitpoints (Special Hits)
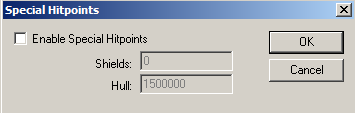
Special HitpointsThis allows you to change the amount of damage a ship can take to its hull and shields (if the ship class has any) before it is destroyed.

Additional Ship Properties/Ship Flags (Misc)

Ship Flags Editor 
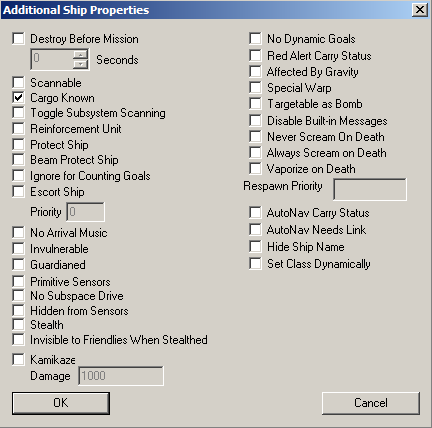
Pressing the Misc button brings up a dialog box. You'll hear this window called by several names around the community and the offical one (Additional Ship Properties) is probably the least used one. Mostly it is known as the Ship Flags Editor.

Destroy Before Mission allows the game to have a ship destroyed a certain number of seconds before a mission (leaving debris behind).

If a ship is marked Scannable, the player can scan it the same way they would inspect a cargo vessel. These are different things: scanning just changes the ship's status from Not Scanned to Scanned, but inspecting reveals the ship's cargo. Any ship which does not have Cargo Known can be inspected. Toggle Subsystem Scanning allows you to swap between the two methods of scanning the game allows. By default a big ship can not be scanned as a whole, you must scan individual subsystems. Conversely, a small ship can not have individual subsystems scanned. If you wish to have a big ship scannable or wish to scan the subsystems of a small ship, tick this.

If a ship is a Reinforcement Unit, it can be called into the mission by the player.

If you check Protect Ship, no AI-controlled ship will attack this one. Beam Protect Ship merely prevents capital ship beams (if the game features beam weapons) from targeting this ship. (These can both be overriden by explicit beam firing orders, given with the fire-beam SEXP operator.)

Ignore For Counting Goals takes this ship out of consideration in SEXP operators like percent-ships-destroyed.

Any ship marked as an Escort Ship will show up in the Monitor Display on the right side of the player's HUD. There is room for several ships here, so FS2_Open will pick the escort ships with the highest priority values. Any Asteroid on a collision course with an escorted ship will be bracketed in white when the mission is played. Do not make the mistake of only adding a value for the most important ships in your mission. You should always assign a priority to any capital ship in your mission. That way the game can still keep the escort list useful if ships depart or are destroyed.

No Arrival Music disables the dynamic fanfare when this ship arrives.

A ship which is Invulnerable takes no damage, even from collisions. This is extremely useful in testing: by making Alpha 1 invulnerable, you can fly around and watch the action without fear of being destroyed. Don't forget to uncheck this when you're done with the mission! Guardianed is a relative of invulnerable. A guardianed ship can not die but it can take damage and it can have subsystems destroyed. This makes it much less obvious that a mission designer is keeping a ship alive artificially. At 1% hull a guardianed ship will take no further damage to the hull but subsystems may still be killed. The SEXP system gives you access to a more powerful version of this option via the ship-guardian-threshold and ship-subsys-guardian-threshold SEXPs but at time of writing it's the only way to access it.

No Subspace Drive means that a ship is unable to jump/warp/hyperspace out of the game. Since this is the default method to end a mission in FS2_Open the mission designer must take particular care to ensure the mission always has an ending.

A ship which is Hidden From Sensors will not show up clearly on radar (it will appear as blip that fades in and out) and cannot be targeted. It is important to note that Hidden from Sensors only affects the players. AI are not affected. Stealth on the other hand makes a ship completely invisible on radar and untargetable to players and AI alike. Firing and using afterburners will make a ship more visible to the AI however. Neither of these options are a cloaking device. The ship is still visible to the naked eye. By default you can see friendly stealth craft (but not friendly hidden ones). Invisible to Friendlies When Stealthed makes them invisible to you too.

A Kamikaze ship will ram its target, destroying itself and doing the indicated amount of damage.

If No Dynamic Goals is checked, the ship will stick to its assigned orders. Otherwise, it will stop to defend itself if it feels sufficiently threatened.

In a campaign, a mission can be designated as a Red Alert mission. (This is done in the Mission Specs Editor.) In this kind of mission, the player has not had the chance to return to their base ship for repairs and rearming. Other ships in the previous mission with Red Alert Carry Status will be brought along into Red Alert mission with whatever their current level of damage is.

You can use the B key by default to target bombs in flight and the bombers that launched them. If Targetable as Bomb is ticked this ship may also be targetted in this way.

Disable Built-in Messages allows you to turn off the automatic messages this ship will send based on its persona. It does not turn off scripted messages you have added yourself in the Events Editor. The Mission Specs Editor has a method for turning them off for all ships, this one is for when you need a specific ship or ships to remain quiet.

Never/Always Scream on Death refer to whether to play a specific built in message. By default enemy ships do not send a message and friendly fighters and bombers do. Use these options to change that.

Vaporize on Death makes a ship instantly blow up when killed no matter how large. By default larger ships have explosions rip through them for a while before one big one blows them up.

When a player ship is destroyed in a multiplayer mission, the player will respawn near the ship with the highest Respawn Priority.

Hide Ship Name quite simply prevents a ships name appearing on the HUD. This can be used to make all Cylon Raiders appear as simply "Cylon Raider" on the HUD rather than "Bandit 4 - Cylon Raider"

Set Class Dynamically tells the game that instead of simply setting the ship class to the one you see here in FRED on game start it should instead look through the pool of ships left that was provided in the player loadout menu and make sure that there are still ships of this class available. If there are not, it will pick one that still is using the rules determined in the Alt Ship Class Dialog.

Initial Status Editor

Initial Status Editor This dialog box lets you control various aspects of the ship's initial status on mission start or when it arrives in the mission.

Velocity is the ship's initial speed. Note that ships may quickly change velocity to carry our orders or position themselves within wings. Also, ships emerging from hyperspace may have a high initial velocity regardless of how this is set depending on the game.

If a ship is supposed to be damaged at the beginning of a mission, reduce its Hull Integrity below 100. You can also adjust the integrity of individual subsystems, such as engines and turrets. If you don't want to do all this by hand, consider using the subsys-set-random SEXP operator.

Unchecking Has Shield System will render a fighter or bomber shieldless. It requires that a ship actually has shields defined in the first place so you may see it ticked for ships which don't. You can safely ignore it in these cases.

If Locked is checked, the player cannot change the class or weapon loadout of the ship before launching the mission.

Primaries/Secondaries/Turrets/Afterburner Locked turn off the weapons or afterburner of this ship. Which ones you need to turn off depend on the ship in question. You can turn them back on again using the relevant SEXPs.

A ship can begin Docked With another ship. In some situations, you will have a choice as to where a ship will dock. To see where the docking points are located, turn on Show Model Dock Points in the View Menu.

The field labeled Cargo here doesn't do anything.

Initial Orders


Here you can specify what the ship is trying to do at the beginning of the mission. New orders can be given later using the Events Editor.

The orders that can be given here are equivalent to those that can be given later with SEXPs, so we'll skip the detailed explanation for now. Note that the word Attack is used here where chase is used in the SEXP operators.

Although there appears to be room for them, you can't give a ship more than 5 initial orders. You can give additional orders using the Events Editor.

Arrival and Departure Cues

Here you can control when the ship enters and leaves the mission. By default, the ship is present when the mission starts, and never leaves. If you want the Ship Editor window to be smaller, clicking on Hide Cues will toggle this part of it on or off.

Choices for Location are Hyperspace, Near Ship, In Front Of Ship, and Docking Bay. If you choose anything but hyperspace, you must also select a Target ship to be near and a distance.

The Cue itself is a SEXP. The ship will arrive or depart after this becomes true and then the number of seconds given in Delay has passed.

Restrict Arrival/Departure Paths is used when the ship has been set to arrive/depart from the docking bay of a ship to tell the ship exactly where to launch from/land. You would use this to tell a Viper to launch from the portside viper tubes rather than allow the game to choose and maybe use the starboard ones or even the flight pods.

Check No Warp Effect if this would be inappropriate, such as when a ship is appearing in the distance in a nebula.

The area at the bottom (which may extend below the edge of your screen) is the SEXP help, explaining the currently highlighted SEXP. In the unlikely event that you want to turn this off, you can do so in the Help Menu.

Wings Editor


This is very similar to the Ships Editor, but it allows you to edit properties of a wing. If a control appears in both editors, you should use the Wings Editor for features which will be the same for all ships in a wing (such as initial orders).

By turning # Of Waves above 1, you can have more ships come in whenever the wing gets down to the number of ships specified in Wing Threshold (by default this is 0 meaning you have to kill all the ships in a wave before the next one will be triggered).

You can also set the minimum and maximum Delay Between Waves (in seconds) in the Arrival panel. Make the minimum high enough that it's not obvious that these guys were just waiting in hyperspace for their last comrade to die. This is also a good way to give the player time to reload between frenzied dogfights. At the other extreme, don't make the maximum delay so high that the player is flying around for minutes waiting for something to happen.

By checking No Arrival Message, you can turn off the built-in message (such as "Beta wing here" or "New bandits incoming") that is normally sent when a new wing arrives.

Delete Wing deletes all of the ships in the wing, and Disband Wing deletes the wing but leaves the ships in place.

Objects Editor


This allows you to place objects much more precisely than you can with the mouse. This is useful for lining up neat rows of cargo containers, for example. You can also make an object Point To another object or at a particular location in space.

Waypoint Paths Editor


This allows you to rename a waypoint path. This could be useful if you have so many paths that it's hard to keep track of the numbers.

You can also rename jump nodes (If you're working on a game that features them) with this editor.

Mission Objectives Editor


Here you can specify the player's goals for the mission. There are three kinds of goals: Primary, Secondary, and Bonus. Success in the mission requires completing all Primary goals. Bonus goals are not listed in the mission briefing, and will not appear on the in-flight objectives list (F4 by default) until completed.

The Name of the objective is used in-flight, while the longer text line below it is used in the briefing. Score is the number of points toward promotion awarded for completing this objective. (This is in addition to any points for destroyed ships.) In a multiplayer mission, you must also specify which Team is trying to complete this goal.

If Objective Invalid is checked, this objective will not show up in any lists or be required for victory. This is used for objectives which should not be obvious at the beginning of the mission, such as stopping a surprise attack. To make the objective valid later in the mission, create an Event with the validate-goal SEXP operator.

If Don't Play Completion Sound is checked, there will be no musical fanfare for completing this goal. This might be appropriate for not-so-heroic goals like "scan all cargo containers".

The large area at the bottom of this editor is for SEXP help.

Events Editor

 
The Events Editor is the heart of FRED2. This is where you "script" your mission, setting up radio messages, HUD directives, and other things that occur over the course of the mission.

There are really two areas of the Events Editor: the Event Panel on the left, dealing with events, and the Message Panel on the right, dealing with messages. (The word "panel" is being used loosely here, as the two areas overlap to some degree.)

Event Panel

The large white area in the upper left is for the various event SEXPs. SEXP help is given in the box at the bottom of the Events Editor (not shown here).

New Event adds a new event to the end of the list. Insert Event adds a new event just before the currently highlighted one. Delete Event deletes the highlighted event.

An event can be made to occur several times by specifying a Repeat Count (how many times it will tested) and an Interval Time (number of seconds between repetitions). For example, consider this event:

Suppose this event has a Repeat Count of 5 and an Interval Time of 10. It will send a message from Command as soon as Alpha 1 gets within 100 meters of the container. After the event has been triggered once the game will then test to see if the player is near the container every 10 seconds and will send the message again if he is. (The message will be sent at most 5 times.) It is a common misconception that the game will wait 10 seconds and then wait for the event to trigger again. This is not true. The game will wait 10 seconds, test, wait ten seconds more, test again etc. If the player times it right he can fly within 100m of the container at any time between the tests (i.e if he is 50m from the container 15 seconds after the first message was sent, nothing will happen). If you want to make something happen any time the player goes near the container you must use Variables in additon to a repeat count.

The player can Score some points when this event occurs. In a multiplayer mission, you must also specify which team scores when this event occurs.

If an event is Chained, it will not occur until and unless the one listed immediately before it has occurred. If a Chain Delay is specified, that many seconds must have passed since the previous event.

Directive Text is given at the left side of the player's HUD. FS2_Open is quite clever about this. If you set an event to occur when Kali wing has been destroyed, and give Directive Text "Destroy Kali", the HUD will show the number of ships left in Kali wing. Be warned however that events using the is-event-true-delay SEXP use it to determine when to show the directive not when it is complete unless you supply the 3rd optional argument.

Directives first appear in the HUD when it becomes possible for the player to bring about the event. For example, if the event requires the destruction of some ship, the directive won't show up in the HUD until that ship arrives. Also, if the event is chained, the directive won't show up until the previous event occurs.

If an event has Directive Text, the dot (or chain link) to the left of its name will be red instead of blue.

You can also specify the default key the player should press to bring about this event; this is useful mostly in training missions. In a training mission (see the Mission Specs Editor), if you surround the name of the key with dollar signs ("Press $spacebar$"), FS2_Open will automatically adjust if the player has remapped their keys.

Message Panel

A list of all of the Messages in the mission is shown in the upper right. Use New Msg to create a new one, and Delete Msg to delete the highlighted message.

For a message to actually be sent, you have to create a send-message event. The source of the message can be a particular ship, or the # symbol followed by whatever you want (The game will simply use everything after the # as the message source). FRED automatically provides #Command as an option as this was commonly used in Freespace.

The Name of a message is strictly for use within FRED2. Message Text is what appears at the top of the player's HUD.

ANI File is the animated "talking head" that appears at the upper left side of the player's HUD when this message is sent. This is unused in many games including Diaspora. In Freespace 2 CM stands for command, TP are Terran pilots, VC is Vasudan command, and VP is a Vasudan pilot.

Wave file is the .wav file played with this message. You can choose from the many built-in wave files, or select one of your own (which should be placed in the data\voice\special subdirectory). The button with the little triangle plays the selected wave file.

Games often include files to help with mission design. For instance Freespace 2 had these files in the data\voice\special directory:

File Description
emptymsg.wav Empty message
msgstart.wav Beep for beginning of message
msgend.wav Static burst for end of message
vasudantalk.wav Long sample of Vasudan speech

If you send a message with a wave file and FS2_Open can't find the file, the message text will be displayed without any audio (or voice synthesis will be used if you have turned the feature on)..

Persona indicates which "character" is speaking. It corresponds to the the personas set in the Ships Editor. Pick whichever one is appropriate. When you pick a new built-in wave file or click on Update Stuff, the ANI File and Persona are both updated to the correct values for that wave file. If a fighter or bomber is going to send such a message, set the persona in the Ships Editor to match so that chatter messages will have the same face and voice.

Team Loadout Editor

Team Loadout
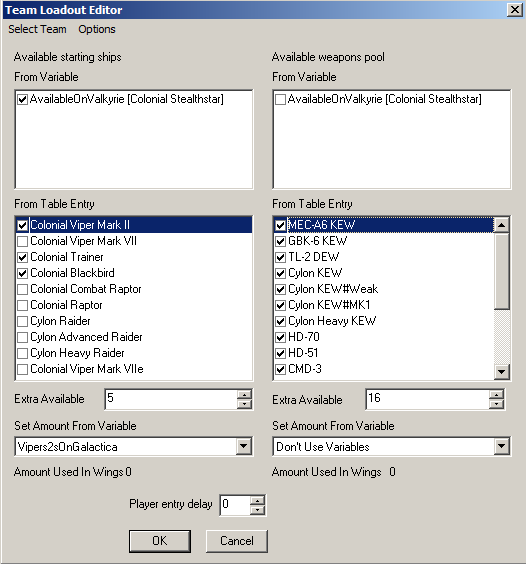
Here, you can select what additional ships and weapons are available for each team. When the player starts the mission he will then be able to choose from the ships and weapons you have allowed him to here (There is a similar list in the Campaign Editor which may disallow ships enabled here.)

In multiplayer TvT games you will need to use this editor to set up the loadout for both teams. You can however use Balance Teams from the Options menu to copy the currently selected team data over that of the other team.

The editor is basically split in two with the left controlling ship loadout and the right controlling weapons. The two are basically the same so we'll only cover ships here. In order to select a ship class you must select a line from the From Variable or From Table Entry boxes. You then use the Extra Available option to set the number of ships of that class that are available (or use Set Amount From Variable to set the number available to the value of a variable). Using variables is only of any use in a campaign (where you can set the value of the variable in one mission and then use it in a later one). For a stand alone mission you might as well ignore them.

Amount Used In Wings shows you the number of ships of the selected class that are already present in friendly wings. Player Entry Delay is a delay on mission start before the player will be allowed to do anything.

Background Editor

 
The background editor lets you add stars, planets, and nebulae to your mission. (There is a separate editor for Asteroid Fields.)

Import Settings

Import Background

The background editor allows you to have two different backgrounds in a file. Only the first one will be used in the game though. You can use the second one to make it easier to Import entire background settings from other missions though. By using the Swap With option you csn then compare the two backgrounds against each other and decide which one you prefer.

Bitmaps

The Bitmaps panel lets you place planets, nebulae, and other background images.

Click on Add to add a new image and Delete to delete the currently highlighted image. The field in the upper right lets you choose from several dozen built-in images. dneb stands for dark nebula, neb is nebula, and of course planet is planet.

The next three fields determine the position and orientation of the currently highlighted image. P stands for pitch (degrees above the horizon), B is bank (degrees of clockwise rotation), and H is heading (degrees left along the horizon). The default position (0, 0, 0) is straight ahead when you open FRED2. These numbers all range from 0 through 359.

The Scale fields let you make the image larger (for example, to make a planet appear closer). These range from 0.001 (one thousandth normal size) to 18. With a planet, these should be equal; otherwise, you'll get a goofy-looking elliptical planet.

The # divisions fields determine how many sections the bitmap is divided into for mapping onto the sphere of the sky. These values range from 1 to 5, but you don't normally have to mess with them. This was mostly used in the original Freespace games and is largely ignored on FS2_Open.

Suns

The Suns panel lets you place bright, nearby stars. It works basically like the Bitmaps panel, but the Scale goes from 0.1 to 50 here.

If you don't put in any suns, you will get a default sun. You can't get rid of it, but you can come fairly close by putting in one sun of scale 0.1.

Nebula

The Nebula panel is for missions that take place inside a nebula. Check Full Nebula for such missions.

Range determines how far (in meters) radar can detect enemy ships. Ships more than half this distance away will appear as faded blips on radar and cannot be targeted.

Pattern is a big background image, overriding any bitmaps. Poofs are clouds swirling in front of the player.

Lightning Storm determines the strength of electromagnetic discharges within the nebula.

Pattern and the other fields below the line in the Nebula panel don't do anything.

Misc

Ambient Light And Misc

Ambient Light allows you to set the colour of the ambient lighting present in the mission. The Takes Place Inside Subspace is a Freespace 2 setting that allows you to set up missions that don't take place in normal space. It is of little use in Diaspora. You specify the Number of Stars (0 to 2000) that will appear in the background of the mission by moving the slider bar but this is an older technique which has since been superceeded by the use of a Skybox Model. Asuitable starfield model is provided with Diaspora and most other FS2_Open games will also provide their own models. Skyboxes can also be used to add large, higher quality background images than the bitmap panel can. The tradeoff is that you can't position or resize them without editing the Skybox itself (Something you can't do from in FRED). FS2_Open will automatically generate an Environment Map on running the game, but if you wish to speciy one of your own, you may do so here.

Reinforcements Editor


This small editor lets you specify which ships and wings can be called in as reinforcements. (You can also do this in the Ships Editor and the Wings Editor.)

To make a ship or wing available more than once, raise Uses above 1. Delay After Arrival is the minimum number of seconds between uses.

Asteroid Field Editor

 
This editor is used to install a field of floating rocks or debris in the mission.
Checking Enabled turns the asteroid field on. In the main FRED window, a wire-frame box will show the boundaries of the field.

An Active Field actually throws asteroids at large ships in or near the field, making it more dangerous. A Passive Field does not.

You can choose from three different colors of asteroids. In a Passive Field, you can also choose different kinds of Ship debris.

The Number of asteroids in the field can range from 1 to 256. When one drifts out of the specified area, it will disappear and a new one will be generated. The game tries to do this behind the player, so it isn't obvious.

The Avg. Speed of the asteroids is given in meters per second.

FS2_Open does not check for collisions between asteroids, so they pass right through each other. Don't make your field too dense, or this will be noticeable.

The Outer Box settings give the boundaries of the field. In an Active Field, you can also specify an Inner Box. No asteroids will appear here, and asteroids will not be hurled at ships inside the inner box. This is useful for hiding an installation inside an asteroid field.

Mission Specs Editor

 
This editor allows you to edit various properties of the mission as a whole. You can also set in-flight music and make designer's notes here.

Mission Specs
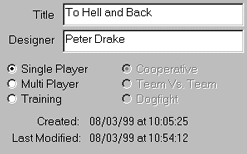
Title is the name of the mission, and the Designer is you.

A mission can be Single Player, Multi Player, or Training. A Multi Player mission can be Cooperative (all players working together), Team Vs. Team, or Dogfight (every pilot for themself).

You can't have a single mission work both for Single Player and Multi Player, but you can have two different mission files that differ only in this detail.

Max Respawns is the number of "lives" each player gets in a multiplayer mission.

Mission Flags

Mission Flags
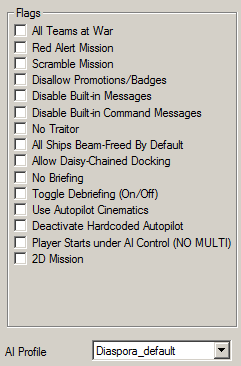
If you check All Teams At War, the rules described in the Ships Editor change and almost all the teams will fight each other (Unless specially exempted by the details in the IFF_defs table.

A Red Alert Mission takes place right on the heels of another one; there is no return to base for repairs. This is mainly important in a campaign.

In a Scramble Mission, there is no opportunity for the player to change their ship or weapon loadout.

If you Disallow Promotions/Badges, they player cannot earn any such awards as a result of this mission.

Disable Built-in Messages allows you to turn off all the automatic messages the game will send from all sources while Disable Built-in Command Messages only turns of the ones send from the Command Persona.

If the player attacks friendly ships the game will send an automatic message warning them to stop, if they do not they will be branded a traitor and all friendly ships will become hostile to them. If the player survives the mission he will be given a special debriefing as a traitor and the mission will be considered a failure. You can turn off all this behaviour simply by ticking No Traitor.

FS2_Open automatically turns off all beam weapons on turrets. There are SEXPs to turn them back on (Beam-free and Beam-free-all) but since this is somewhat tedious, All Ships Beam-Freed by Default turns beams on for all ships. This has no effect in games like Diaspora where there are no beam weapons.

Allow Daisy Chain Docking is used to tell the game that your mission contains ships docked in this sort of fashion A->B->C->D. Simply docking everything to A is allowed without needing to do anything.

No Briefing prevents the game from displaying the briefing screen at the start of a mission.

Toggle Debriefing turns of debriefings for all game modes except multiplayer dogfight where it replaces the kill matrix with a normal debriefing.

Player Starts Under AI Control does exactly what you'd expect. It is mostly used in tutorials or in-game cutscenes.

AI Profile is used to pick which of a set of preprepared game settings will be used. In general you should use the default one for the game the mission is for.

Custom Wing NamesCustom Wing Names

The Custom Wing Names dialog is used to set the names of the wings that appear in Loadout and on the HUD. Starting Wing Names is used to determine the names of the wings that will appear on the loadout screen of the briefing in every type of mission except multiplayer TvT missions. Squadron Wing Names is used to determine the names of the wings that will be shown on the HUD. FS2_Open will show the status of any of the five wings named on this line. Team verses Team Wing Names is the equivalent of Starting Wing Names for TvT missions.

Logo And Loading ScreensYou can use the Squadron Reassign panel to put the player in a particular squadron for the duration of this mission. (This contrasts with their regular multiplay squadron.) You can give the squadron a Name and specify what Logo will be painted on the side of the player's ship.

The game allows you to pick Loading Screens for the two main supported resolutions from this panel too. The image will be shown while the mission loads.

Support And Music
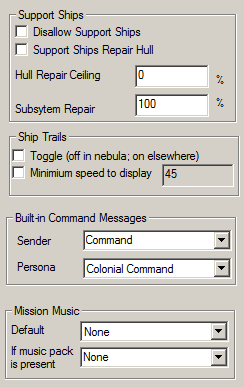
Some games on FS2_Open allow you to use support ships in order to rearm. If you Disallow Support Ships, the player cannot reload their secondary weapons after the mission begins. You can also allow Support Ships to repair hull damage from here and set a limit on just how well they can repair it or destroyed subsystems using the Hull Repair Ceiling/Subsystem Repair options.

The Ship Trails panel is used to turn the smoke trails ships can be set to leave behind on or off.

The Built-in Command Messages options allow you to set the name and persona that is used for sending the built-in messages that the game can send. By default these messages are sent by #Command.

Mission Music indicates what music is played during the mission. Some games include music as an optional download in order to reduce the amount that must be download. In this case you can specify a track to be played If Music Pack Is Present and a Default that you know the game will be able to find.This allows you to for instance make missions for Diaspora R1 which can use music from R2 if it is also present.

The Mission Description shows up when players highlight a mission from the list in the Tech Room Mission Simulator or when choosing a multiplayer mission. Designer's Notes are for the sake of other FRED2 users.

Briefing Editor

 
This editor lets you set up the story at the beginning of the mission, describing the situation to the player and telling them what to do. Of course, there can always be surprises...

When you open the Briefing Editor, two things happen: a very large dialog box appears, and the main view shrinks to about a quarter of its size. The shrinkage is to remind you that, while the Briefing Editor is open, the main view is used to place briefing icons. That's explained below in the discussion of icons.

In a multiplayer TvT mission, first use the Select Team menu to determine who gets this briefing. (You'll need a briefing for each team.)

A briefing consists of a series of stages, each of which has a picture of the mission area and a paragraph of text. Add Stage adds a new stage at the end, Insert Stage adds a stage right after the current one, and Delete Stage deletes the current stage. Prev and Next cycle through the stages.

The large Text area is the text displayed at the bottom of the player's screen as they watch the briefing.

The importance of good spelling and grammar here cannot be overstated. If you're weak in this area, find someone to "proofread" your mission.

A word can be colored by preceding it with one of the following "tags":

Tag Color
$h Hostile radar color
$f Friendly radar color
$n Neutral radar color
$r Red
$g Green
$b Blue

If you want to produce a Voice Wave File, put it in the data\voice\briefing subdirectory. You can either type in the name or Browse for it, and the little triangle will play it.

You can choose from a number of different Briefing Music tracks. The same rules as in the Mission Specs Editor apply here for using music from a music pack.

The Usage Formula is a SEXP determining whether this briefing stage will be used or not. This will simply be true in a single mission, but you may want to do something more interesting in a campaign, perhaps involving SEXP operators like is-previous-goal-true.

Everything else has to do with the picture the player sees during the briefing. This is set up in the main view. The first thing you'll want to do is double-click on this (not on an object) to make it bigger. (It still won't be full-sized, but it will be as big as it will be during the actual briefing.)

You can use the camera movement controls and many other standard FRED2 controls. However, the player will only see those things for which you've created icons.

Having the icons and the actual objects visible at the same time can get pretty messy. There are two ways around this:

  • Turn off most of the features in the View Menu such as Show Ship Models and Show Ship Info.
  • Move the camera to point at an empty area of space and create your icons there, ignoring the actual mission objects.
To make an icon, select a ship and then press Make Icon. (If you're working out in empty space, you'll have to create an object, make an icon, and then delete the object.) You can move an icon around just as you would an object. You cannot rotate it, though, and it will not appear smaller if you move it farther away.

During the briefing, the player only sees icons and the grid. If you don't make any icons, they'll just see a blank grid.

Label controls the text that appears right under the icon; this can be blank. Icon Image determines which picture you get. Ship Type controls what the player sees if they click on the icon during the briefing. (If you didn't know about that feature, go start up a mission in FreeSpace 2 and click on an icon. Neat, huh?) Team determines the color of the icon (it will not change color here, just in the actual briefing).

The Text box at the bottom doesn't do anything. This is a good thing, because it spills off the bottom of your screen anyway.

If you check Highlight, the current icon will be surrounded by a ring of rotating triangles during the briefing.

ID is just a number identifying the current icon. There's no reason to mess with this.

If Change Locally is checked when you make a change (for exampe, to the Icon Image of an icon), that change will not affect other stages of the briefing.

You can delete the selected icon with Delete Icon.

Pressing Propagate causes all icons to appear, in their current positions, in all following briefing stages. If you make a mistake in a stage, you can go back to the previous stage and press Propagate to reset the icons.

Shockingly, checking Draw Lines Between Marked Icons draws lines between the marked icons.

Returning to the top of the editor, Save View "takes the picture" for this briefing stage. If you move the camera around and don't press Save View, the picture will not be from the angle you so carefully set up. Don't forget to do this!

Goto View resets the camera to wherever it was the last time you pressed Save View. You can use Copy View and Paste View to copy a camera angle from one briefing stage to another.

Camera Transition Time is the time in milliseconds that it takes the camera (during the actual briefing) to move from its current position to its position in the next briefing stage.

If you check Cut To Next Stage, you will get static rather than a camera pan between this stage and the next. Cut To Previous Stage is similar, but would only come up if the player hit the Back button during the briefing.

Debriefing Editor


This editor lets you set up the text that appears after a mission telling the player how they did. It is very similar to the Briefing Editor. The differences are:

  • Since there are no pictures in the debriefing, you don't have to mess with icons and camera angles.
  • You will want to use more interesting SEXPs in the Usage Formula area. (Do not use the is-event-incomplete or is-goal-incomplete SEXP operators here. Events and goals are ever incomplete at the end of a mission; they are either true or false.)
  • For a stage corresponding to something the player failed to do, you can include Recommendation Text telling them how to get it right the next time.
  • .wav files should be kept in data\voice\debriefing.

Shield System Editor

 
You can specify here that ships of a particular class or on a particular side don't get shields. This has no effect unless the ship actually has shields defined for it. .
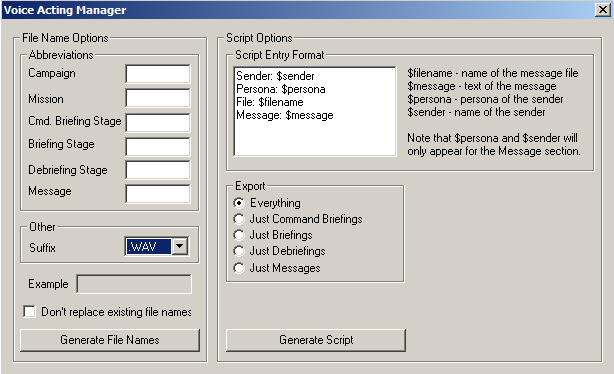
Global Ship Flags Editor

This editor simply allows you to set ship flags for all the ships currently present in a mission. You could have the effect by simply selecting everything and using the Ships Editor -> Ship Flags Dialog.

Voice Acting Manager

Voice Acting Manager

This editor doesn't do anything you couldn't do manually but it greatly speeds up the process of adding voices to a mission and can easily generate a script to be handed out to potential voice actors.

Command Briefing Editor


The command briefing is the higher-level "strategic" briefing that appears every few missions in a campaign.

This editor is similar to the Debriefing Editor, except that:

  • There is no Usage Formula; in a command briefing, all stages are played automatically.
  • You can choose one of the built-in .ani animation files to go with each stage. You can't make your own, so Browse isn't useful.
  • .wav files should be kept in data\voice\command briefing.

Campaign Editor

 
You can create entire campaigns with FRED2_Open. To do this, build the individual missions and then link them together with the Campaign Editor. Be sure to test your missions individually before linking them together.

Once you have created a campaign, you can switch to it in the Campaign Room within FreeSpace 2. Doing this will erase any progress your pilot has made in another campaign! If you're in the middle of another campaign, you may wish to Clone your pilot first, then switch the clone to the new campaign.

Be aware that building a campaign is a lot of work. There are several ongoing campaign projects being coordinated over the Internet; consider volunteering to help with one of them rather than building an entire campaign by yourself.

The Campaign Editor consists of three parts: a Menubar, a Campaign Diagram on the right, and the Main Controls on the left.

Menubar

The File menu has the usual options.

The Other menu just contains an Error Checker. This is run automatically when you save a campaign so you might as well just do that instead.

The Initial Status menu lets you decide which ships and weapons are available at the beginning of the campaign. If a ship or weapon is not checked (and most aren't by default), it will be replaced with something else in any campaign missions that use it. This is a common source of errors for beginning campaign makers. Forgetting to enable allowed ships and weapons here results in the mission having no weapons available when the campaign is started and only having the ship class that was specified in the mission file. To make a ship or weapon available later in the campaign, create Events using the allow-ship or allow-weapon SEXP operators.

Campaign Diagram

On the right side of the Campaign Editor is a diagram of the current campaign. To add a mission, first highlight it in the list of Available Missions on the left side of the editor; then CTRL click in a gray box in the Campaign Diagram. Missions can be moved around by dragging them.

The order of missions in the campaign is determined by the links (lines) between them. To create a link from one mission to the one that should follow it, drag it onto the following mission. It must be placed exactly on top of the followimg mission; you may have to drag the following mission left or right for this to be possible.

A mission can have more than one following mission, with the progress of the campaign determined by the player's actions. This is explained in more detail in the subsection below on the Main Controls.

If you right click on a mission in the Campaign Diagram, a small menu will pop up. Remove Mission removes the current mission from the campaign. Add A Repeat Link makes it possible that the player will have to repeat this mission; such links are not visible in the Campaign Diagram. You should select End Of Campaign for any mission that does not have a following mission.

Main Controls

Campaign Editor Available Missions lists those missions that are not already in a campaign.

Campaign Editor
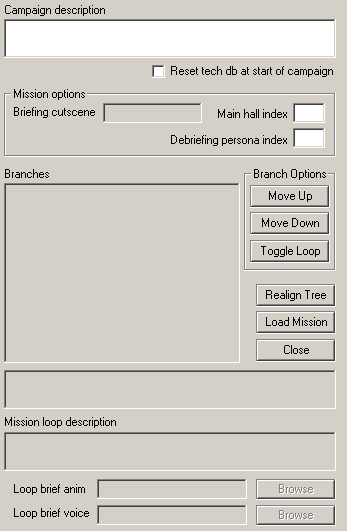
You can specify a Campaign Name and the Type of the campaign (single, multi coop, or multi teams).

The Campaign Description is shown when this campaign is highlighted in the Campaign Room within the game. You may also choose to Reset the Tech Database when this campaign is selected.

The remaining options affect the currently highlighted mission in the Campaign Diagram.

Briefing Cutscene allows you to set the cutscene that is played before any of the other mission stages start. FS2_Open currently supports cutscenes in the .mve format that was used for Freespace and Freespace 2. It also supports movies in the ogg theora format.

FS2_Open allows you to change the appearance of the game's Main Hall from amongst several preprepared alternatives. Changing the index here allows you to choose which one you will use.

The Debriefing Persona Index is used to determine which persona is used for the automatically generated messages that can occur during debriefing (Having your pilot gain a new rank).

Branches are a series of SEXPs that determine which mission will follow this one. When a mission is completed, FreeSpace 2 goes through these and takes the first branch for which the SEXP returns true. The last branch (and no other branch) must have simply true for its SEXP.

When a branch is highlighted, you can move it around with Move Up or Move Down.

Loops are optional branches in a campaign; the player can decide whether to take the loop branch or continue with the main campaign. A branch may be designated as a loop by pressing Toggle Loop.

Realign Tree tries to straighten up the Campaign Diagram so that it looks nicer; it doesn't always help.

Load Mission loads the highlighted mission (in the Campaign Diagram) into FRED2_Open and closes the Campaign Editor. Close closes the campaign editor and returns you to whatever mission you had loaded when you opened it.

There is an obligatory area for SEXP help and below it the Mission Loop Description, is the text displayed when the player is given the option to take a loop branch and the buttons to pick an animation and sound file to play with it.